If you are working on a project to migrate from Cisco, Juniper or Checkpoint to Fortinet here is a handy utility on the Fortinet website which can help out. It let's you take configuration files from the three other major vendors out there and converts what it can for you into Fortinet speak.
http://convert.fortinet.com
If anyone is using this go ahead and post some feedback on how well it works.
Friday, September 26, 2008
Monday, September 22, 2008
Restoring Firewall Configurations
Imagine your firewall bites the dust and you get a shiny new one from Fortinet. You have backed up the configuration file from your old box and want to restore it to your new unit. There is one thing to watch out for during the process if you backed up your file without password protecting it. Here is the process to backup and restore the configuration without running into snags:
Backup the firewall configuration:
-System -> Maintenance -> Backup
Optionally you can password protect the file which is always a good idea. If you do not enter a password your entire configuration is backed up except for the admin account. To successfully restore your configuration on the new system if you did not password protect the file:
-Change the IP address of the new unit or connect to the default IP on the internal interface at https://192.168.1.99. Login using the default of admin with a blank password. Then
-System -> Admin and change the admin user password.
-System -> Maintenance -> Restore configuration from: Local PC
-Click Browse and select the backup configuration file
-Click Restore
If you do not set the admin password before restoring the config file you will no longer be able to login as admin.
Potential GUI Bug in FortiAnalyzer
Here is the scenario under which the problem occurs:
-A firewall is reporting to FortiAnalyzer and is part of a group object
-The firewall is made part of an HA reporting object
The original firewall object is still retained but the "edit" button to the right of the screen is gone. The workaround is to manually edit the group which the firewall is part of and remove the firewall from the group. Then the "trashcan" icon will appear and let you remove the old instance of the firewall.
Labels:
fortianalyzer,
potential bugs


Monday, September 15, 2008
Active FTP on non-standard Ports
When you use active ftp the FortiOS session helper keeps track of the connections you open. It then permits the ftp server you are connecting with to actively open a connection back to your client program. This works well as long as you use FTP on its standard TCP port which is 21. If you have an application which needs to open active FTP connections on a port other than 21 you need to add additional session helpers. Here is how you do it on the command line:
config system session-helper
show (this lists all the helpers configured. Note the last edit, in this example "edit 11")
** snip **
edit 10
set name sip
set port 5060
set protocol 17
next
edit 11
set name dns-udp
set port 53
set protocol 17
next
end
edit 12 (the number you use here should be the last edit + 1)
set name ftp
set port 999 (in this example the application uses ftp on port 999, substitute your port number here)
set protocol 6
end
In the above example we are configuring the firewall to listen on port 999 and treat connections on this port as active FTP.
Labels:
CLI,
configuration examples,
fortigate,
fortios
Thursday, September 11, 2008
VPN GUI Bug in MR5 and MR6
A GUI bug exists in MR5 and MR6 when configuring IPSEC VPNs. This has been confirmed in MR5 Patch 4 and MR6 Patch 2 and may exist in other versions.
The following will cause you to lose any Phase 2 Security Associations configured under the corresponding Phase 1:
-Phase 1 configured using routed (interface) mode
-Any number of phase 2 SAs
-The VPN is assigned to a zone under System -> Network -> Zone
When you attempt to rename the phase 1 object you receive an error message "Object in Use". This message indicates that the VPN is in use by a zone which is normal. When returning to the VPN configuration screen at VPN -> IPSEC -> Auto Key (IKE) all your phase 2 SAs have been lost completely. They are also erased from the system configuration and cannot be recovered without a backup of the configuration.
** Update **
This was bug 68864 and has been resolved in FortiOS 3.0 MR7 Build 726.
Labels:
fortigate,
gui,
potential bugs
Wednesday, September 10, 2008
Fortinet and Cisco MARS Integration
Cisco MARS is a tool which collects netflow and syslog data from the devices on your network and correlates them to look for specific events. It allows you to find suspicious activity on the network such as port scans or virus outbreaks. Here is a handy guide for integrating Fortigate firewalls by sending syslog data to MARS so the firewall data can contribute to your event analysis.
In the Fortigate GUI:
-Go to Log&Report -> Log Config
-Enable the Syslog check box and and enter the name or IP address of your Cisco MARS collector
-Set Port to 514
-Set Minimum Log Level to Information and the Facility to Alert
That's it on the firewall side. Now any active firewall rule configured to log traffic will send syslog information to MARS.
In the Cisco MARS GUI:
-Go to Admin -> Custom Setup -> User Defined Log Parser Templates
-At the Device/Application type click Add and enter the following values:
-Type: Appliance
-Vendor: Fortinet
-Model: Generic
-Version: 3.0
-Click Submit
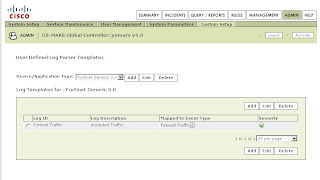
-Under Log Templates for Fortinet Generic 3.0 click Add and enter the following values:
-Log ID: Fortinet Traffic
-Description: Accepted Traffic
-Under the Map to Event Type click Add and enter the following values:
-Event ID: Firewall Traffic
-Description: Firewall Traffic
-Severity: Green
-Click Submit
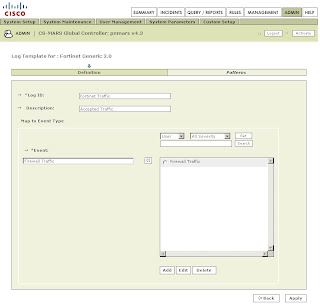
Back on the Log Template Page select the newly created Firewall Traffic Event Type and click on the left double arrow to move it into the Event box. Then click Apply.
Once this has been applied click on Patterns which has become an active link.
Add the following patterns in order. Leave all Value Format fields blank except for the one in position 1:
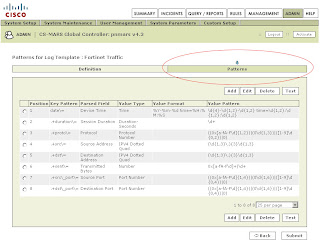
Position: 1
Key Pattern: date\=
Parsed Field: Device Time
Value Type: Time
Value Format: %Y-%m-%d time=%H:%M:%S
Value Pattern: \d{4}-\d{1,2}-\d{1,2} time=\d{1,2}:\d{1,2}:\d{1,2}
Position: 2
Key Pattern: .+duration\=
Parsed Field: Session Duration
Value Type: Duration-Seconds
Value Pattern: \d+
Position: 3
Key Pattern: .+proto\=
Parsed Field: Protocol
Value Type: Protocol Number
Value Pattern: ((0x[a-fA-F\d]{1,2})|(0\d{1,3})|([1-9]\d{0,2})|0)
Position: 4
Key Pattern: .+src\=
Parsed Field: Source Address
Value Type: IPV4 Dotted Quad
Value Pattern: (\d{1,3}\.){3}\d{1,3}
Position: 5
Key Pattern: +.dst\=
Parsed Field: Destination Address
Value Type: IPV4 Dotted Quad
Value Pattern: (\d{1,3}\.){3}\d{1,3}
Position: 6
Key Pattern: .+sent\=
Parsed Field: Transmitted Bytes
Value Type: Number
Value Pattern: 0x[a-fA-F\d]+|\d+
Position: 7
Key Pattern: .+src\_port\=
Parsed Field: Source Port
Value Type: Port Number
Value Pattern: ((0x[a-fA-F\d]{1,4})|(0\d{1,6})|([1-9]\d{0,4})|0)
Position: 8
Key Pattern: .+dst\_port\=
Parsed Field: Destination Port
Value Type: Port Number
Value Pattern: ((0x[a-fA-F\d]{1,4})|(0\d{1,6})|([1-9]\d{0,4})|0)
Click Submit.
Under System Setup -> Device Configuration and Discovery Information -> Security and Monitor Devices you can now configure devices of type Fortinet Generic 3.0
(Thanks to Pandriya for spotting a typo in this post)
Labels:
configuration examples,
fortigate
Software Updates
Fortinet has release the following software updates at their support website:
Fortimanager 3.0 MR7 Patch 1
Fortimail 3.0 MR4 Patch 1
Fortianalyzer 3.0 MR7 Patch 1
Fortimanager 3.0 MR7 Patch 1
Fortimail 3.0 MR4 Patch 1
Fortianalyzer 3.0 MR7 Patch 1
Labels:
fortianalyzer,
fortimail,
fortimanager,
software
Subscribe to:
Posts (Atom)